Surgical Critical Care: Tracheostomy
Tracheostomy
Benefits (Compared to Endotracheal Intubation)
- More Comfortable & Better Tolerated by the Patient
- Decreased Dead Space & Airway Resistance
- Decreased Work of Breathing
- Improved Pulmonary Toilet, Oral Care & Secretion Clearance
- Facilitates Liberation from Ventilator
- Decreased Ventilatory Dependent Days
- Shorter Hospital Stay
- Shorter ICU Stay
Indications
- Indications:
- Will Require Prolonged Mechanical Ventilation > 7 Days
- Unable to Protect the Airway (Unable to Clear Secretions, Severe TBI, Severe Maxillofacial Injury or Severe Neck/Vocal Cord Injury)
- Complex Tracheal Repair
- Cervical Spinal Cord Injuries
- Ventilator Dependent Due to Frequent Trips to the OR
- Relative Contraindications to Percutaneous Approach:
- FiO2 > 60%
- PEEP > 12
- Peds (Collapsible/Mobile Trachea)
- Moderate-Severe Coagulopathy
- Midline Neck Mass
- BMI > 30
Timing
- Definitions Vary
- Early: Approximately 2-14 Days
- Late: Approximately 14-21 Days
- Benefits:
- Early Tracheostomy
- Higher Likelihood of Ventilator Liberation
- Earlier Return to Walking, Talking & Eating
- No Change In:
- Ventilator Associated Pneumonia (VAP)
- ICU Length of Stay
- Hospital Length of Stay
- Mortality
- Early Tracheostomy
- Specific Indications for Early Tracheostomy:
- Severe TBI
- Cervical Spinal Cord Injuries
Surgical Approach (Open vs Percutaneous)
- Percutaneous Tracheostomy
- Lower Risk of Surgical Site Infection
- Improved Scar Cosmesis
- Faster Procedure
- Lower Cost
- Similar Bleeding, Decannulation Risk & Mortality
Other Considerations
- Inner Cannula – Allows Easy Replacement of the Cannula if it Becomes Obstructed or Filled with Secretions

Tracheostomy 1
Tracheostomy – Material
Material
- Shiley (Coviden) – Polyvinyl Chloride Plastic (Most Common)
- Bivona (Portex) – Silicone (Softer & More Flexible)
- Jackson – Metal (Rarely Used)
Size
- In General Use the Largest Size Possible
- Most Common Sizes:
- Adult Males: 8.0-8.5 mm
- Adult Females: 7.5-8.0 mm
Cuff
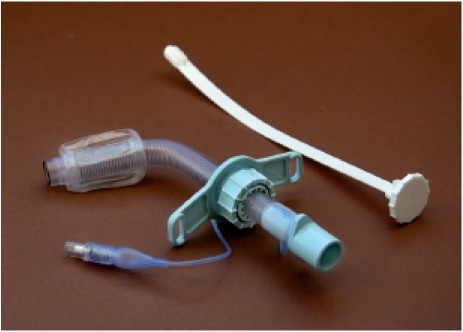
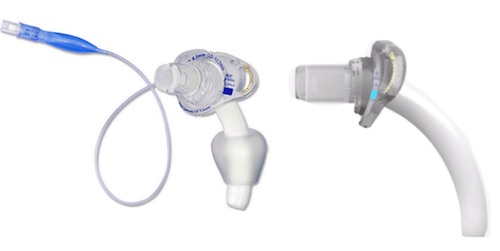
- Cuffed: Allow Secretion Clearance, Protect from Aspiration & Allow More Effective PEEP
- Generally Preferred
- Cuff Pressure Should Be Maintained at 15-22 mmHg to Avoid Injury (Tracheal Capillary Perfusion Pressure is Normally 25-35 mmHg)
- Uncuffed: Allow Airway Clearance but No Protection from Aspiration
Fenestration
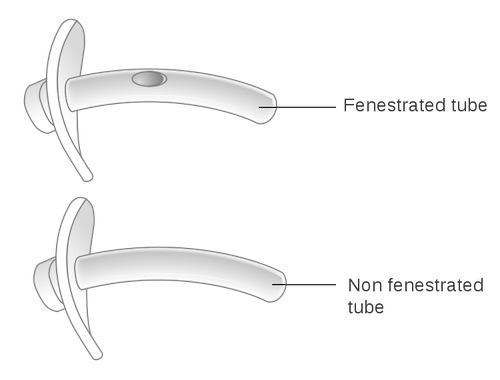
- Has an Additional Opening in Posterior Tube, Above the Cuff
- Also Requires a Fenestrated Inner Cannula
- Allows Airflow Around the Tube but Does Not Prevent Aspiration
- Used During the Weaning Process, Generally Not Used for the Initial Placement
Length
- Standard
- XLT (Extended-Length Tube)
- XLTP – Extra Length Proximally (In-Neck Before the Radial Turn)
- For Swollen/Thick Neck Anatomy
- XLTD – Extra Length Distally (After the Radial Turn into the Trachea)
- For Long Tracheal Anatomy or Tracheal Stenosis
- XLTP – Extra Length Proximally (In-Neck Before the Radial Turn)

Tracheostomy; Cuffed (Left) and Uncuffed (Right)

Fenestrated Tube (Top), Non-Fenestrated (Bottom) 2
Tracheostomy – Procedure
Goal Location
- Location: Below the Second or Third Tracheal Rings
- Risks of Improper Position
- Higher: Stenosis
- Lower: Tracheo-Innominate Fistula
Open Tracheostomy
- 2 cm Incision (Horizontal or Vertical) About 2 Finger-Breadths Above the Sternal Notch
- Divide Platysma & Retract Laterally
- Retract Thyroid Isthmus Superiorly
- Expose the Trachea
- May Place Stay-Sutures
- Preform Tracheostomy with #11 Blade Scalpel Under the Second or Third Tracheal Ring
- Pull Endotracheal Tube Back to Just Above the Tracheostomy Site
- Insert Tracheostomy Tube, Place Inner Cannula & Inflate the Balloon
- Fully Remove the Endotracheal Tube
Percutaneous Dilational Tracheostomy (PDT/Modified Ciaglia Technique)
- May Use Bronchoscope Through the Endotracheal Tube to Directly Visualize the Procedure
- Generally Recommended but Not Mandatory
- 2 cm Incision (Horizontal or Vertical) About 2 Finger-Breadths Above the Sternal Notch
- Retract the Endotracheal Tube Proximal to the Second/Third Tracheal Ring
- Access the Trachea:
- With Bronchoscope: Needle Placed with Direct Visualization
- Without Bronchoscope: Advance a Needle with a 10 cc Saline Syringe to Enter the Trachea Confirming Position Once Air Bubbles Return in the Syringe Under Negative Pressure
- Pass Guidewire Through the Needle & Then Remove the Needle
- Dilate the Tract Over the Guidewire
- First Using the Short-Dilator
- Next Either with Multiple Serial Dilation (12-36 French) or a Single Tapered Dilator (Blue-Rhino)
- Insert the Tracheostomy Tube on an Appropriate Dilator Over the Guidewire
- Appropriate Dilator: 20 + The Size Tube (No. 8 Tube Over a 28 F Dilator)
- Remove the Dilator & Guidewire
- Insert the Inner Cannula & Inflate the Balloon
- Possibly Secure the Trachea to the Skin with 2-4 Sutures (Debated – No Evidence They Actually Prevent Accidental Decannulation)
Additional Content
References
- Kramp B, Dommerich S. Tracheostomy cannulas and voice prosthesis. GMS Curr Top Otorhinolaryngol Head Neck Surg. 2009;8:Doc05. (License: CC BY-NC-ND-3.0)
- Cancer Research UK. Wikimedia Commons. (License: CC BY-SA-4.0)